-
Table of Contents
“Empowering Homeowners: Simple, Accurate, and Quick Tap Water Testing at Home!”
Introduction
Testing tap water at home involves a series of procedures to determine the quality and safety of the water for consumption and usage. This process includes collecting a water sample, using a home water testing kit, and interpreting the results. The kit typically contains strips that change color to indicate the presence of various contaminants such as bacteria, lead, pesticides, nitrates, chlorine, hardness, and pH levels. The results can help identify any potential health risks and guide necessary actions for water treatment.
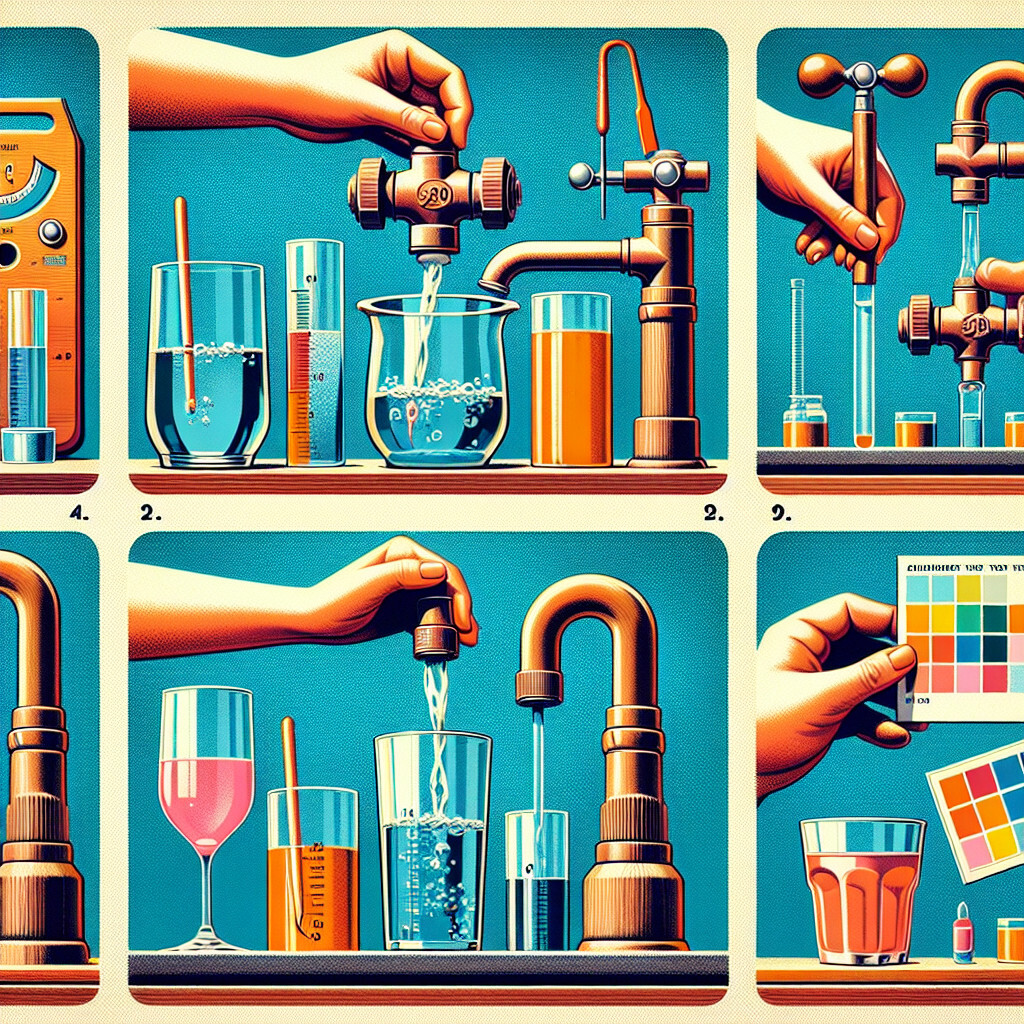
Step-by-Step Guide to Testing Tap Water at Home
Testing the quality of your tap water at home is an essential task that ensures the safety and health of your household. This article provides a step-by-step guide on how to conduct this crucial test.
Firstly, it is important to understand why testing tap water is necessary. Tap water, despite undergoing treatment before reaching your home, can still contain harmful contaminants. These can range from bacteria and viruses to heavy metals and chemical pollutants. Regular testing allows you to identify these potential hazards and take appropriate action.
The first step in testing your tap water is to decide what you want to test for. Common tests include pH levels, hardness, presence of bacteria, and levels of lead and other heavy metals. The choice of test depends on your specific concerns. For instance, if you live in an older home with lead pipes, testing for lead would be advisable.
Once you have decided on the tests, the next step is to purchase a home water testing kit. These kits are readily available online or at local home improvement stores. They come with detailed instructions on how to collect and test your water samples. It is crucial to follow these instructions carefully to ensure accurate results.
To collect a water sample, choose a tap that is frequently used, such as the kitchen sink. Let the water run for a few minutes before collecting the sample. This ensures that you are testing the water that is currently in your pipes, not water that has been sitting in the pipes for a while. Fill the provided container with water, making sure not to touch the inside of the container or the water with your hands as this could contaminate the sample.
After collecting the sample, you can proceed with the testing. Most kits require you to add a specific amount of testing solution or a test strip to the water sample. The water will then change color based on the presence and concentration of the contaminants. Compare the color of the water to the color chart provided with the kit to determine the results.
If your test results indicate the presence of harmful contaminants, it is important to take immediate action. This could involve installing a water filtration system, using a water purifier, or in severe cases, contacting your local water authority for further assistance.
While home water testing kits provide a convenient and affordable way to test your tap water, they may not detect all types of contaminants. For a more comprehensive analysis, consider sending a water sample to a certified laboratory. These labs can test for a wider range of contaminants and provide more accurate results.
In conclusion, testing your tap water at home is a simple process that can provide valuable information about the safety of your water supply. By choosing the right tests, using a home water testing kit, and taking appropriate action based on the results, you can ensure that your tap water is safe to drink. Remember, the health of your household may depend on the quality of your tap water, so regular testing is a wise precaution.
Understanding the Importance of Regular Tap Water Testing
Understanding the importance of regular tap water testing is crucial for maintaining good health and ensuring the safety of your household. Tap water, despite being treated by local water facilities, can still contain harmful contaminants. These can range from heavy metals like lead and mercury to bacteria, pesticides, and other organic compounds. Regular testing of your tap water can help identify these potential hazards and allow you to take appropriate action to ensure the safety of your drinking water.
The process of testing tap water at home is relatively straightforward and can be done using a variety of methods. One of the most common methods is using a home water testing kit. These kits are readily available online or at local home improvement stores and come with detailed instructions on how to collect and test your water samples. They typically include test strips that change color to indicate the presence of specific contaminants. The color changes can then be compared to a chart provided with the kit to determine the concentration of the contaminant.
Another method of testing tap water at home involves sending a water sample to a certified laboratory. This method is more accurate and comprehensive than home testing kits, as labs have access to sophisticated equipment that can detect a wider range of contaminants at lower concentrations. However, this method is also more expensive and time-consuming, as it involves shipping the sample and waiting for the results.
Regardless of the method you choose, it’s important to collect your water sample correctly to ensure accurate results. This typically involves running your tap for a few minutes before collecting the sample to flush out any stagnant water in the pipes. The sample should then be collected in a clean, sterilized container to prevent contamination.
Once you have your results, it’s important to understand what they mean. The presence of certain contaminants, such as lead or bacteria, can pose serious health risks and should be addressed immediately. Other contaminants, such as chlorine or minerals, may affect the taste or appearance of your water but are not necessarily harmful. If you’re unsure about your results, it’s always a good idea to consult with a water quality expert or your local health department.
Regular tap water testing is not just about ensuring the safety of your drinking water. It can also help you identify issues with your plumbing system. For example, high levels of copper or lead can indicate corrosion in your pipes, while the presence of bacteria could suggest a problem with your water heater.
In conclusion, regular tap water testing is an essential part of maintaining a healthy and safe home. Whether you choose to use a home testing kit or send your sample to a lab, the important thing is to test your water regularly and take action if contaminants are detected. By doing so, you can ensure that your tap water is safe to drink and use, protecting the health and wellbeing of your household.
DIY Methods for Checking the Quality of Your Tap Water
The quality of tap water is a crucial aspect of maintaining good health. While most municipal water supplies are regulated and treated to ensure they meet safety standards, it’s still possible for contaminants to find their way into your home’s water supply. Therefore, it’s essential to know how to test tap water at home. This article will guide you through some do-it-yourself methods for checking the quality of your tap water.
Firstly, one of the simplest ways to assess your tap water is through a sensory evaluation. This involves using your senses of sight, smell, and taste. Clear water without any unusual smell or taste is generally considered safe. However, if your water appears cloudy, has an odd smell, or tastes metallic, it could indicate the presence of contaminants. While this method is straightforward, it’s not foolproof as many harmful contaminants are odorless, tasteless, and colorless.
Moving on, another method involves using home water testing kits. These kits are readily available online or at home improvement stores and come with detailed instructions. They typically include test strips that change color when dipped in water, indicating the presence of various contaminants such as lead, bacteria, pesticides, nitrates, chlorine, and hardness. The color changes on the strip are then compared to a color chart provided with the kit to determine the level of each contaminant. While these kits provide a more comprehensive analysis than a sensory evaluation, they may not detect all possible contaminants.
In addition to these methods, digital water quality testers are also an option. These handheld devices provide instant readings of the total dissolved solids (TDS) in your water. TDS refers to any inorganic and organic substances in your water, including minerals, salts, and metals. High TDS levels can affect the taste of your water and may indicate the presence of harmful substances. However, it’s important to note that these devices only measure the total amount of substances, not the specific types or levels of individual contaminants.
Furthermore, you can also consider sending a water sample to a certified laboratory for testing. This method is the most accurate and comprehensive, as labs can detect a wide range of contaminants at very low levels. They can also provide detailed reports on the specific types and amounts of contaminants in your water. However, this method can be more expensive and time-consuming than the others.
Lastly, it’s worth mentioning that if you’re concerned about a specific contaminant, such as lead or radon, you may need to use a specialized test. These tests are designed to detect specific substances and can provide a more accurate assessment of their presence and levels in your water.
In conclusion, testing your tap water at home is a practical step towards ensuring the safety of your drinking water. Whether you choose a sensory evaluation, a home testing kit, a digital tester, or a lab test, each method has its strengths and limitations. Therefore, it’s essential to choose the method that best suits your needs and concerns. Remember, the quality of your water can directly impact your health, so it’s worth taking the time to ensure it’s safe.
How to Use Home Water Testing Kits Effectively
Testing the quality of tap water at home is a crucial step in ensuring the health and safety of your household. With the advent of home water testing kits, this process has become more accessible and straightforward. These kits are designed to detect a variety of contaminants, including lead, bacteria, pesticides, and other harmful substances that may be present in your tap water. However, to obtain accurate results, it is essential to use these kits effectively.
The first step in using a home water testing kit is to understand what you are testing for. Different kits are designed to detect different contaminants, so it’s important to choose a kit that suits your specific needs. For instance, if you live in an older home with lead pipes, you may want to choose a kit that specifically tests for lead. Alternatively, if you’re concerned about bacteria due to a recent illness in your household, a kit that tests for bacteria would be more appropriate.
Once you’ve chosen the right kit, the next step is to collect a water sample. This should be done carefully to avoid contamination. Most kits will provide detailed instructions on how to do this. Generally, you’ll need to run your tap for a few minutes before collecting the sample to ensure that the water you’re testing is coming from the pipes and not just from the faucet. The water should be collected in a clean, sterilized container, usually provided with the kit.
After collecting the sample, you’ll need to apply the test reagents or strips provided with the kit. Again, it’s important to follow the instructions carefully. Some tests may require you to add a certain number of drops of reagent to the water sample, while others may require you to dip a test strip into the sample for a specific amount of time. In either case, it’s crucial to adhere to the instructions to ensure accurate results.
Once the test is complete, you’ll need to interpret the results. Most kits will provide a color chart or other guide to help you understand what the results mean. For example, a test for lead might indicate a positive result if the water turns a certain color. If you’re unsure about the results, it’s a good idea to consult with a professional or contact the kit’s manufacturer for clarification.
It’s important to remember that while home water testing kits can provide valuable information about the quality of your tap water, they are not a substitute for professional testing. If your kit indicates the presence of contaminants, or if you have ongoing concerns about your water quality, it’s advisable to have your water professionally tested. This can provide a more comprehensive analysis and can help you determine the best course of action to ensure safe, clean drinking water for your household.
In conclusion, home water testing kits can be a useful tool in monitoring the quality of your tap water. By choosing the right kit, carefully collecting a water sample, accurately conducting the test, and correctly interpreting the results, you can effectively use these kits to help safeguard the health of your household. However, remember to seek professional advice if your results indicate a potential problem or if you have any doubts about your water quality.
Q&A
1. Question: What are the methods to test tap water at home?
Answer: The methods to test tap water at home include using a home water quality test kit, digital TDS (Total Dissolved Solids) meter, or pH test strips.
2. Question: Where can I purchase a home water testing kit?
Answer: Home water testing kits can be purchased from home improvement stores, online marketplaces like Amazon, or directly from manufacturers’ websites.
3. Question: How do I use a home water testing kit?
Answer: To use a home water testing kit, you typically collect a sample of your tap water in a provided container, add the provided reagents, and then compare the color change to a chart to determine the levels of various contaminants.
4. Question: What contaminants can a home water testing kit detect?
Answer: A home water testing kit can detect a variety of contaminants such as bacteria, lead, pesticides, nitrates/nitrites, chlorine, hardness, and pH levels. The specific contaminants detected will depend on the kit.
Conclusion
In conclusion, testing tap water at home can be done using various methods such as pH test strips, TDS meters, or home water testing kits. These tools can help identify the presence of harmful contaminants like lead, bacteria, pesticides, and other chemicals. It’s important to follow the instructions provided with each testing method to ensure accurate results. Regular testing can ensure the safety and quality of your tap water.